Why use MTM Test Runner[]
Executing tests from within MTM provides a couple of important benefits:
- Reporting - The fact that the test was run, by whom, the date/time, and the results are all logged in TFS for future reporting and analysis.
- Data Collection - MTM will automatically collect various pieces of data while you are running the test that can prove valuable (especially if you uncover a bug while running the test):
- Video Recording - MTM will automatically record your screen while you are running the test and store the video alongside the test results in TFS. This can be useful if you uncover a bug to help reproduce the bug in the future (and to show the developer exactly what you did). It can also be useful to prove that testing was done, and exactly how it was done.
- System Information - MTM will automatically record detailed information about the system which you ran the tests from. Things like the version of windows, the version of Internet Explorer, your screen resolution, memory available, etc. This information can sometimes be useful in understanding why something went wrong if bugs are uncovered during testing.
- Action Recording - In addition to the video that MTM records, it also attempts to track everything you click on, and everything you type, and creates a text file that lists all the actions you took. This can be useful in understanding how to reproduce any issus that are discovered during testing.
Running Tests[]
There are some MTM/TFS concepts that you should be familiar with, and will be referred to below: Test Cases, Test Suites, Test Plans, Test Runs, Test Results.
You have a library of Test Cases. You have a Test Plan to represent actual Testing Activities. Within a Test Plan the Tests are grouped into Test Suites, often a Test Suite for each User Story. When you run tests you will be creating a Test Run, which contains a Test Result for each Test Case included in that Test Run.
To run tests via MTM, follow these steps:
- Open the Test Plan which you will be executing tests for. All Tests must be run within the context of a Test Plan (and the Test Results will be associated with that Test Plan).
- Navigate to the Test tab (The Plan and Test tabs look similar and sometimes confuse people. The Plan tab is used for authoring Tests, the Test tab is used for running them)
- Select the Test Suite you wish to run tests for. For Implementation Test Plans you should typically have one Test Suite for each User Story. Each Test Run can only include tests from one Test Suite.
- Highlight one or more Tests which you want to run. Note: Even if the Test has previously been run and is marked Pass or Fail it can still be re-run. You can also highlight a passing/failing test and click Reset to Active to indicate that this Test needs to be re-run.
- Click the Run button. This will bring up the Test Runner interface.
- If you selected multiple Test Cases to run as part of this Test Run, the Test Runner will walk you through each Test Case one at a time.
- The Test Runner lists each Test Step along the side of the screen. Each Test Step can be given a Pass/Fail result, in addition the Test Case as a whole will receive a Pass/Fail.
- As you execute each Test Step you should mark it as Pass/Fail by clicking the drop-down or using the keyboard shortcut. It is not necessary to mark every Step as Pass/Fail, but it is necessary to mark each one that has an Expected Result (these steps will have a slightly different icon with a checkmark)
- When you have completed the Test Case click End Test at the bottom.
- When you complete the Test Case the entire Test Case will be marked as Pass/Fail automatically (if you didn't fail any step, and marked every Expected Result step as Pass - the Test Case will be marked Pass). Alternatively, you can manually set the Test Case Pass/Fail at the top of the Test Runner window before clicking End Test.
- If there are more Test Cases in your Test Run the next one will be displayed. When you finish the last Test Case the End Test button will become greyed out, and you should click Save and Close to exit the Test Runner.
- You will notice in the Test Tab the Test Cases you just ran should now be marked as Passing/Failing instead of Active.
")
")
")
")
")
")
")
Test Failures[]
During a Test Case you may encounter a problem which should result in a failed Test. When this happens, follow these steps:
- Mark the step where you encountered the problem as Fail.
- This will prompt you to enter a comment in the Test Step describing the reason this failed.
- Optionally you can choose to use the screenshot tool built into the Test Runner to take a screenshot and include it in the Test Results.
- If you wish to create a Bug as a result of this failure, click the Create Bug button in the toolbar. This will launch the Create Bug form and pre-populate the description, and automatically attach various files that contain the data collected by the test runner (e.g. system info, video recording, action log, screenshots, etc). It will automatically create a link between the Bug and the Test Case. Often all you need to enter is a Title and click Save and Close.
- At this point you can choose to End Test and continue with any subsequent tests in this Test Run. Or you can click Save and Close which will record this Test as a Failure, and skip executing any subsequent tests in this run (any not run Tests will remain as Active).
")
")
Pausing a Test Run[]
During a Test Run you may choose to Pause the Test Runner at any time. The main benefit of this is it will cause the Data Collectors (e.g. Video Recording) to pause their collection. This is useful if you need to take a break (e.g. break for lunch in the middle of a test run), or you get interrupted during a Test Run and need to temporarily switch to another task. MTM allows you to Pause and Resume the Test Run. It is even possible to Pause the Test Run, close the Test Runner application (and MTM) and Resume the Test Run at a later time.
- Click the Pause button in the toolbar.
- Click Resume in the Test Runner to resume the Test Run.
- Alternatively, you can close the Test Runner by clicking the X. And even close MTM if you choose. When you return to MTM at a later time, the Test Case will be in paused status, and there will be a Resume button available. You can also click Run instead of Resume to start the Test Case from the start.
")
")
")
[]
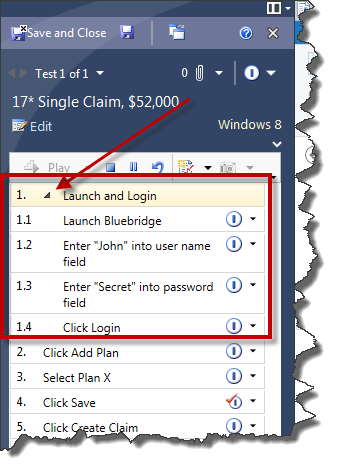
If the Test Case you are running contains Shared Steps, they will show up in the Test Runner with a little arrow to expand the Shared Steps. Once you expand it, each step within the Shared Steps will have a Pass/Fail status, and will be numbered as pictured below.
Executing Test with Shared Step
Parameters and Iterations[]
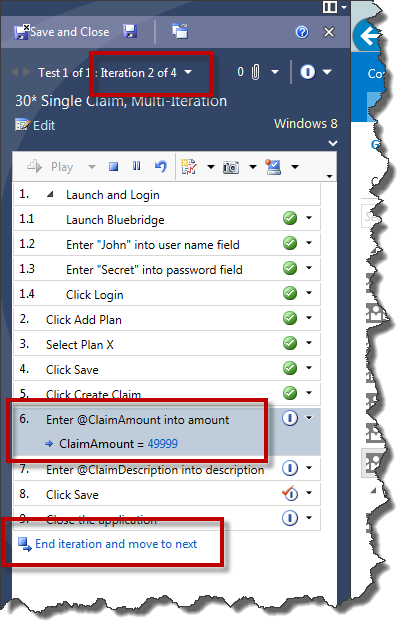
Any Test Step that includes a parameter will display the parameter values inline with the step. In addition you can click the parameter value to copy it to the clipboard for easy pasting into the software under test. If there is only one parameter for the Test Step (the typical case), the parameter value will automatically be placed on the clipboard.
If a Test Case has multiple iterations, instead of End Test button at the bottom, it will say End Iteration. At the top of the Test Runner it will indicate which iteration you are currently on and how many more this Test Case has. It is expected that when running a multi-iteration Test Case all iterations will be run and will receive a Pass/Fail result.
Parameters and Iterations
Viewing Test Results[]
There are several ways to view results of previously run Tests. Keep in mind that a single Test Case may have multiple Test Results if it has been run multiple times. Also remember that Test Results are specific to the Test Plan you are in. So you will only see Test Results for the current Test Plan.
When viewing Test Results, there are 2 views you may find yourself in. The details of the entire Test Run (which may include multiple Test Cases), or the detailed results from a specific Test Case within a Test Run.
Here are a few different way to access the Test Results:
- From within the Test tab (Run Tests sub-tab), it will group the Test Cases based on the most recent Test Result for each one. So you can quickly see which Test Cases are Passing/Failing/Active/Paused.
- If you double-click a Test Case from this view it will bring up the most recent Test Result details for this Test Case. There will also be a list at the bottom of all Test Results for this Test Case. You can double-click entries in this list to jump to those Test Results.
- Click Analyze Test Runs sub-tab within the Test tab. Ensure that Manual Test Runs is selected. It will provide a list of all Test Runs over the time period selected. Double-Clicking a Test Run will bring up the Test Run details. From there will be a list of Test Cases within this Test Run, which can be double-clicked to drill-down to the details for each Test Case.
By viewing the Test Results you can see who ran which tests, when they were run, and any comments or attachments that were created (e.g. screenshots, videos, etc) during each Test Run.
")
")
")
")
")
Frequently Asked Questions[]
When should I fail a Test Case?
If any Steps are marked as failed the entire Test Case should be marked as a Failure. If you allow MTM to automatically set the Test Case result this is the default behaviour.
What to do if I notice a problem unrelated to the Test Case?
A common example is you are running a Test Case that is testing some piece of logic, and you notice a spelling mistake on one of the screens (but the logic in question works as intended). In this case the Test Case should still be passed as the behaviour that is targetted by the Test Case is working as intended. However, we want to make sure we capture the spelling mistake so that it can be corrected. In this case you should still mark the Test Step and Test Case as Passed. However, you should create a Bug via the Test Runner (the same way described for Failed Tests above). You can attach a screenshot, and any relevant comments when creating the Bug.